
Syrian Wars Maps and Rules
![]()
Syrian Wars
Seleucid Empire vs. Ptolemaic Empire
Copyright Jeff Jonas 2009

Figures by Jeff Jonas on the left, Paul Rigby's nice Polemarch phalanx on the right.
![]()
![]()
![]()
![]()
![]()
![]()
![]()
![]()
![]()
![]()
![]()
![]()
![]()
![]()
Campaign Page
One ![]() Two
Two ![]() Three
Three ![]() Four
Four ![]() Five
Five ![]() Six
Six ![]() Seven
Seven

The Road to Moab: Raiders of the lost diadem 219 BC:
It's one hundred and four years after the divine Alexander's death and tensions are once again heating up along the borders between the inheritor empires of Syria under the Seleucids and the Egyptian empire of the Ptolemies. Ptolemy IV's indolence has been a sharp contrast to the vigor of Antiochus III's ruthless campaigns against rebels and usurpers. Neither king feels himself seated firmly on the throne, and each empire is crumbling at the edges. As part of the campaign to legitimize each potentate's power and stature among other world powers, each empire has seized as many artifacts of Alexander as possible. The Ptolemies were the first to seize on this by capturing Alexander's tomb and keeping it in Alexandria, the Seleucids own Babylon Alexander's seat of power. Sosibius, the Ptolemaic grand vizier, has noticed that public support for the regime has been waning of late, no small part due to the lax manner and wastrel ways of the young king. The vizier secretly negotiated with the Parthians when they sent him word that they had found an Alexandrian relic in the temple of Isis near Ecbatana. This relic was none other than the Royal Diadem worn by glorious Alexander as he rode into Persepolis, before chasing Darius towards the north and Bactria. Sosibius has sent officers to secretly purchase the relic and carry it back through the back trails of the silk trail to Petra, where his agents would then pick it up and take it to Alexandria. Along the way, lips loosened by wine in Damascus led to a security slip and somehow the secret cargo of the caravan was gleaned by local Seleucid officers. Immediately the governor of Syria organized a column to intercept the caravan. Spies in Syria revealed this news to Sosibius and he set a column in motion to find the caravan and bring it safely to Jerusalem.... Just outside of Hesbon the dusty caravan gets organized for the day's journey at dawn, but a camel scout notes dust clouds on the road to Philadelphia, to the north, and dust clouds coming towards them from the south from Hesbon. The Ptolemaic agents know that jig is up.
Such is the beginning of the Syrian Wars......
*********************************************************************
Game Overview:
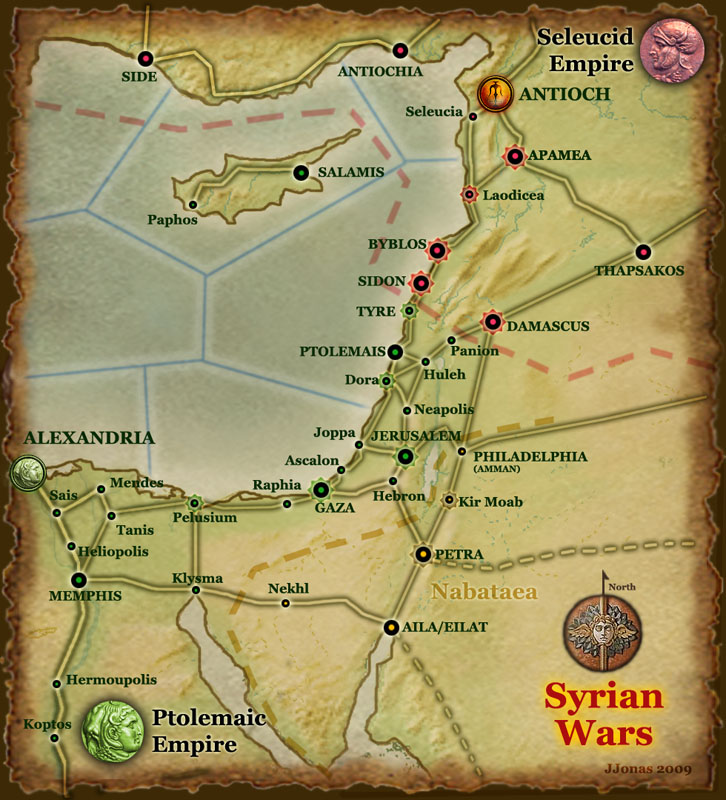
The Syrians wars is a map based excuse for generating a thematic game structure for miniatures battles. It is not a formal economic strategic overview, it is merely the framework to generate game context. On the following pages one can follow how the campaign has moseyed along so far. It's always nice when both sides are commenting, and Paul Rigby's blog not only is an excuse to detail how his army is progressing, but can also detail his victories and defeats. The Map presented here simply lists the avenues of approach that were followed during the wars fro Cole Syria (hollow Syria) between the Seleucid Empire and the Ptolemaic Empire. The game is presented to roughly follow the trends of the conflict starting with the initial border wars to all out battles like Raphia, then the break while Antiochus III went east and rebuilt his army and added the cataphracts, to roughly the events after the battle of Panion (200 BC). Ultimately the goal is to try to knock the other empire off the map, and take their capitol city, which for the Ptolemies is Alexandria, and the Seleucids; Antioch.
The Game Turn:
A game turn is an amorphous period of time, based around a campaign season. Some campaign seasons are longer, some include frenetic activity and many actions. Each "turn" is a year marked down from 219 BC to 196 BC. Some years may be entirely inactive (such as when an Eastern Anabasis is triggered: See the random events table below). Until the Campaign Season is ended by a random event, every week a new action phase is triggered. At the start players may roll off to see who take the first action. Usually it is best to start off small with raids and small battles, this way players can add new troops to their armies based on the regular game schedule. But again this is about creating framework for games, which can be skirmishes, naval games, sieges, or just about any sceanrio players are interested in, including mega-battles between multiple players.
The Map:
The game map is broken into zones named for a major city. Ptolemaic cities at start have Green dots, Seleucid cities have Red dots, neutral Nabataean cities have Yellow dots. The current dashed border is where play begins. Bounding moves can be made along any connected City Zone. Naval moves can be made to any connected Sea Zones.
The Action Phase:
The Action Phase is based on who is the agressor. That player
makes a move or takes an action that will either lead to a game or siege, or just more
bally-hoo and propaganda blustering.
Before the Action Phase begins players consult the Random Events Table. Consultation
can be done in person, but email is a great way to run this campaign. The roll can
be made with a D10 or just by consulting a stock result on a set day. For example
the Random Events Table could be consulted by using a well known Stock number such as
Wells Fargo (WFC). So assuming that the chart is consulted every two weeks, on a
Friday... then just wait until the market closes and look at the last digit, that will be
the random result. So today WFC was 29.05, so a "5" results in "Heavy
Rains." Some of the Random Events mean nothing, some can really alter things.
Once the Random Event is in it is now up to the Aggressor to make a bounding move, assault a city under siege, or pass. A move can be a "bound" of one or two spaces from any friendly owned space on the map, into enemy territory. A two bound move results in a battle, or raid , or overrun of enemy cities in the path. Fortresses may not be moved over, a player must stop and declare a siege. However once a siege is started the player may then bound off in other directions, but a besieged fortress is always considered the limit of the empire's boundary for future moves. Sieges can be resolved by playing games, the siege assault chart, or random events. A player only has enough equipment to besiege one enemy fortress at a time.
Once the Aggressor has made his decision, the Defending player declares his reaction. The reactions are:
| All Out Battle: a "Pitched
Battle" of 3000+ points per side. Decisive Victory in an All Out Battle creates a Victory Ripple of 5 zones, Minor Victory creates a Victory Ripple of 3 zones. |
| Major Battle: a "Pitched
Battle" of 2500-3000 points per side. Decisive Victory in an Major Battle creates a Victory Ripple of 4 zones, Minor Victory creates a Victory Ripple of 3 zones. |
| Battle: a "Pitched Battle"
of 2000-2500 points per side. Decisive Victory in an Major Battle creates a Victory Ripple of 3 zones, Minor Victory creates a Victory Ripple of 2 zone. |
| Raid: a skirmish of 1500 points or
less. (See Raids below) Decisive Victory in a Raid creates a Victory Ripple of 2 zones, Minor Victory creates a Victory Ripple of 1 zone. |
| Major Ambush: an Ambush scenario of
2000-2500 points per side. (Ambush can be played if the agressor moves two bounds into
enemy turf). Decisive Victory in a Raid creates a Victory Ripple of 2 zones, Minor Victory creates a Victory Ripple of 1 zone. |
| Ambush: an Ambush scenario of
1000-1500 points per side. (Ambush can be played if the agressor moved from enemy turf to
enemy turf). Decisive Victory in a Raid creates a Victory Ripple of 1 zone, Minor Victory creates a Victory Ripple of 0 zone. |
| Pass: the player lets the phase pass. The Agressor gains any zones uncontested but must still besiege fortresses. |
| Naval Battle: may attempt a
Naval action if "Clear Sailing" allows a Naval bound. Decisive Victory in a Naval Battle creates a Victory Ripple within the sea zone, Minor Victory creates a Victory Ripple of 0. Winner gains Naval Advantage. |
| Breakout: a force may attempt
to break out of a siege from within, play at 2000-2500 points. This could be a Naval
Battle if it is a coastal city. Decisive Victory in a Breakout creates a Victory Ripple of 1 zone, Minor Victory creates a Victory Ripple of 0 zone. |
| Special Scenario: City
Assault, The Aggressor force may attempt to assault a breach instead of besieging,
play at 2000-2500 points attacker, 1000 pts defender. Decisive Victory in a City Assault creates a Victory Ripple of 1 zone, Minor Victory creates a Victory Ripple of 0 zone. |
![]()
![]()
![]()
![]()
![]()
The Battle Phase:
Players then agree on a scenario based on the reaction above. Play then moves to the tabletop.
Decisive Victory can be achieved by breaking the enemy army at
25%. Or by acheiving all scenario goals, and beating the enemy by more than 1000
pts.
Minor Victory can be achieved by defeating the enemy by at least 500 pts.
Anything else is a draw. A drawn combat sees the player stanch shift so the Defender now
becomes the Agressor.
![]()
![]()
![]()
![]()
![]()
The Victory Ripple:
Once a game has been decided players then consult the Victory Ripple chart. Each enemy city within the number of zones caused by the ripple are affected. This way a major victory can sway large swaths of territory to the winning side. Capitols are never affected by the Victory Ripple chart. Fortresses are less affected sicne they are garrisoned.
![]()
![]()
![]()
![]()
![]()
Veterans:
It is recomended that players use the Veterans, Veteran Characters, and Victorious Generals rules on page 94-95.
After any Decisive or Major Victory a player may designate one unit Veterans, and one character may be promoted as a Veteran Character.
After any Victory of 500 pts or greater the winning player's general may roll on the Victorious General Chart on page 95.
![]()
![]()
![]()
![]()
![]()
Losses:
Generally this campaign is not structured over losses and accounting. However there are stresses that players should note as a result of their games. For example if a player loses his heavy cavalry run down in pursuit or annhilated, then those troops should be out of commission for the next game at least. If a player losses over half his phalanx troops in the last game, he might have to be restricted in phalanx troops for the next game to a certain percentage.
Stress losses in this case are most likely among elite troops, elephants, and phalanx core troops. Mercenaries can most always be found, but certain elite types should be regulated in the same ways.
Another way to play is to have a roster of units that make up the greater army, then each unit is kept track of. Units carry their losses for the campaign season then replenish at the start of the next year. This way that unit of Cretans can be wiped out, and they stay wiped out for the campaing season.
Generally the Ptolemaic player should be punished for losing his
phalangites, as they are difficult to replace, until the Machimoi are triggered.
Generally the Seleucid player should be punished for losing his argyraspides phalangites,
and elite heavy cavalry. (More details how this works)
![]()
![]()
![]()
![]()
![]()
Random Events Table:
| Roll: | Random Event | Effects |
| 0 | Ptolemaic Civil Unrest | Roll on the Ptolemaic Unrest chart. *TBD |
| 1 | Good Recruiting | Each side may take an extra 100 points of mercenaries for the next game. |
| 2 | Storms at Sea | Naval Advantage is removed |
| 3 | Clear Sailing | A Naval Move and Naval battle can be made. |
| 4 | Drought | Any army in Nabataea is destroyed, any siege in Nabataea is broken. Possible dust Storms in battles. |
| 5 | Good Hunting | Players gain a free elephant in their next game. |
| 6 | Treachery | Any city under siege may fall, add + 5 to the siege table. |
| 7 | Seleucid Civil Unrest | Roll on the Seleucid Unrest chart. *TBD |
| 8 | Heavy wind or Rains | Only one bound is allowed this action phase. Siege results reduced -1. Possible mist/dust clouds in battles. |
| 9 | Storms | Only one bound is allowed this action phase. Siege results reduced -2. Possible rain/dust storms in battles. |
| 10 | Campaign Season Ends | Reset the campaign to the next year. |
Add +1 to roll, for each action phase after six.
After any Ptolemaic Decisive Victory add +2 to roll.
Mist/Dust clouds: Roll 1D6 at the start of each turn. On a
roll of 1-3 there is a mist/dust cloud effect. Add +1 after the first turn.
Effects: Mist/dustcloud, no long range shooting is allowed.
Rain/Dust storms: Roll 1D6 at the start of each turn. On a
roll of 1-3 there is a rain/dust storm effect. Add +1 after the first turn.
Effects: Rain, no long range shooting is allowed. All visibility
is reduced to 12".
![]()
![]()
![]()
![]()
![]()
Siege Effects Table:
| Roll: | Siege Effects | Effects |
| 0 | Attacker defeated | Call off siege |
| 1 | Siege Continues Defender edge | Next time roll with a -1 modifier |
| 2 | Siege Continues Defender edge | Next time roll with a -1 modifier |
| 3 | Siege Continues no gain | |
| 4 | Siege Continues no gain | |
| 5 | Siege Continues Attacker edge | Next time roll with a +1 modifier |
| 6 | Siege Continues Attacker edge | Next time roll with a +2 modifier |
| 7 | Siege Continues Attacker edge | Next time roll with a +3 modifier |
| 8 | Siege Continues Attacker breach | Roll again with a +3 modifier |
| 9 | Siege Continues Attacker breach | Roll again with a +5 modifier |
| 10 | City falls | Roll 0-8 City is captured. Roll a 9 and the City is sacked... the horrors!! |
Minor cities add +1 to roll.
Fortresses subtract -1 from roll.
Naval Advantage add +1 to roll against port city.
Naval Disadvantage subtract -1 to roll against port city.
Treachery add +5 to roll.
![]()
![]()
![]()
![]()
![]()
Naval Battle Table:
| Roll: | Naval Battle | Effects |
| 0 | Aggressor decisively defeated | Decisive defeat results in loss of Naval Advantage for the rest of the game. |
| 1 | Aggressor defeated | Naval Advantage switches. |
| 2 | Aggressor defeated | Naval Advantage switches. |
| 3 | Aggressor defeated | |
| 4 | Indecisive battle | |
| 5 | Indecisive battle | |
| 6 | Defender defeated | |
| 7 | Defender defeated | Naval Advantage switches. |
| 8 | Defender defeated | Naval Advantage switches. |
| 9 | Defender decisively defeated | Decisive defeat results in loss of Naval Advantage for the rest of the game. |
| 10 | Defender decisively defeated | Decisive defeat results in loss of Naval Advantage for the rest of the game. |
Naval Advantage add +1.
Fleet Tactician add +1.
![]()
![]()
![]()
![]()
![]()
Victory Ripple Table:
The Victory Ripple represents how a victory affects the area. Decisive victories can swing large tracks of land back and forth.
| Roll: | Random Event | Effects |
| 0 | No Effect | The city remains loyal |
| 1 | No Effect | The city remains loyal |
| 2 | No Effect | The city remains loyal |
| 3 | No Effect | The city remains loyal |
| 4 | Shift Allegiance | The city becomes neutral |
| 5 | Shift Allegiance | The city becomes neutral |
| 6 | Shift Allegiance | Switch sides |
| 7 | Shift Allegiance | Switch sides |
| 8 | Shift Allegiance | Switch sides |
| 9 | Shift Allegiance | Switch sides |
| 10 | Shift Allegiance | Switch sides |
Fortresses subtract -1 from roll.
Major cities subtract -1 from roll.
Spys= Each Spy option played allows a re-roll.
Decisive victory add +2 to roll.
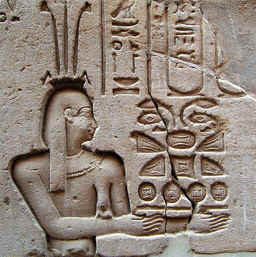
"Pharoah is in the know" Ptolemy
![]()
![]()
![]()
![]()
![]()
![]()
![]()
![]()
![]()
![]()
![]()
![]()
![]()
![]()
Follow the Seleucid side of the campaign on Paul Rigby's Blog:
http://paulwargamespot.blogspot.com/
![]()
![]()
![]()
![]()
![]()
![]()
![]()
![]()
![]()
![]()
![]()
![]()
![]()
![]()
Wise Ptolemy speaks:
"Fish and Seleucids stink after three days."
One
![]() Two
Two ![]() Three
Three ![]() Four
Four ![]() Five
Five ![]() Six
Six ![]() Seven
Seven
Back to AncientBattles.com Home Page
05/21/11