

Painting a 28mm Mercenary Hoplite
Page 1: Painting a Mercenary Hoplite Page 2: Finishing the Regiment
I paint a
little differently than others, I use a lot of techniques... I'm not
ashamed to mix hiliting and shadowing with drybrushing and washes or
dyes... whatever it takes to get a cool looking realistic miniature on
the tabletop is what I'm after. Most of my wargames figures are painted
to game with, I try to do my best, but I feel display figures are the
place to put in the high quality work... gaming figures need only be
good enough at arm's length! But still I am proud of my work and try to
do as good a job as time permits. Occasionally, I even get new stuff
onto the gaming table which is the ultimate goal. So
I've started a new unit of hoplites for my AtG Persian army and I have
taken some "Step-by-Step" photos along the way. Most of these steps are
nothing new and radical, I just felt it would be a nice internet
reference. Once I finish the project, I will post some "how to" paint
links.
 |
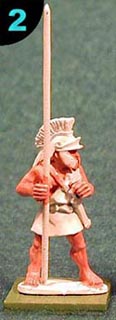 |
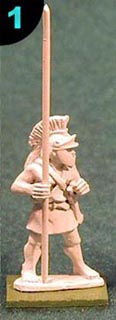
1) Starting off with the basics. This is to be a unit of 32 mercenary hoplites. Most will be unarmored Foundry 28mm figures from their World of the Greeks range, they will join the Bronze Goat samples I reviewed recently on the Web site. I cleaned and scraped the figures then primed them in white. I used Spray Krylon for these, Flat White. Normally I don't attach spears until later, but in this case I had a couple of reasons why I wanted to up front. First the hands are open and I have experienced a lot of breakage when spears are later glued to open handed figures (drilled hands are much sturdier for gameplay). Another reason was 'ranking up' the figure on bases. The model pictured is simple with his upright spear, but others in the front ranks are fighting over and under handed. With spears it is best to try to align things before one starts, otherwise when you put together your models they may do more fighting with themselves than any opponents. The spears themselves are floral wire and brass rod, both ends were ground down on a flat file and one end was crimped with needle nose pliers and pounded flat. I little filing and trimming with nail clippers can add a nice curved edge to these home grown spears (thanks to Don Manser for the nail clippers tip!) 2) Next, just like a bazillion other painters, I paint a flesh base tone. In this case I used acrylic, Delta Ceramcoat Sante Fe Rose (02496). (I use some fancy paints but most of my wargames figures are done in cheap acrylic hobby store paint.. that's because I am mostly cheap, and Ceramcoat will certainly last as long as I care to worry about my figures! I'm not knocking the good stuff though) This coat gives a nice color base, I don't put it on straight, but a little bit thinned, as that lets some of the white below to pop through. |
 |
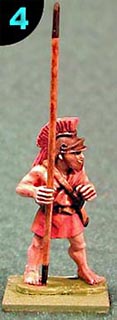 |
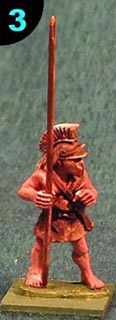
3) At this point I have already decided that this unit of mercenary hoplites will have red tunics, nothing revolutionary there at all. I block in all the rest of the the figure with Burnt Sienna (02030) another Ceramcoat "Must have" color. I even paint the metal parts as this is a good under color for bronze. I'm not too fussy about this coat but I don't want to thickly fill details, so this is thin as well. The end result is a figure that has all of its surfaces covered, and no white sticking through. I do this mainly to keep from having an embarrassing white spot show up under a tunic, but also to give me a base to work from. 4) Here the figure has had red applied (this time its an Americana bottle called True Red) and some hilites on the flesh tones have been added with some old AppleBarrel acrylic Medium Flesh (20556). I used a fairly small brush here about a #1 and paint in the hilites, leaving as much of the Sante Fe Rose in the recesses. The same goes for the tunic, a lighter shade is painted on, which is mixed between the red and some nice Ceramcoat Maple Sugar Tan (02062) . I just blend the two colors together and soon enough you have plenty of midrange and highlight color to work with. At this point the technique is the same as the Foundry style made famous by Kevin Dallimore, but not quite so stark. |
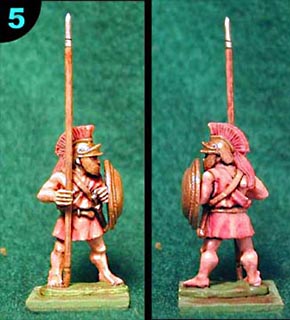 |
5) Here the model is almost
finished. The skin tones have been hilited, the tunic as well...
the armor has been covered with a bronze tone (amazingly enough)
Ceramcoat again, this one is Gleams Bronze 02606. This
covers the Burnt Sienna base pretty good, but usually
I'll need to put on a second coat in large areas as it is thin.
Wait for this to dry though as it will 'pull' if you apply it too
soon. Where I live there ain't no moisture, so things dry fast..
too fast sometimes. The key with the bronze is not to get clumpy
as this paint is not quite as self-leveling as others.
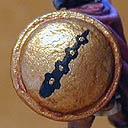
Once thoroughly dry, I tone down the brightness and add detail a Liquitex "Wood Stains" Cherry acrylic stain will be applied to the armor then it will be hilited with gold to give it a burnished look. The shield is quickly dry-brushed with some Citadel Shining Gold, to make it pop and sizzle. After that the shield design and basing will commence. |
 |
 |
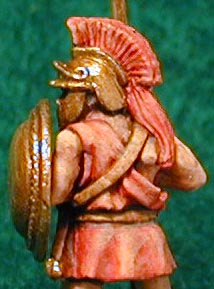
6) These photos show the simple shading techniques fairly well. It is easy to mix colors once you get the hang of it, in this case I wanted a bit of a faded look so the soldier looks like he's been stomping around Anatolia for a while. |
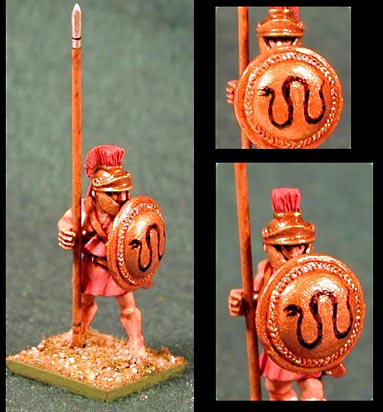 |
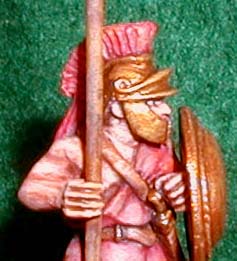
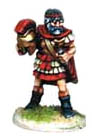
7) Finally, here's our
finished hoplite ready to take his place in the phalanx. Normally
I don't dwell on one figure like this at time (there's 31 fellows
in line to join the regiment). Yes, I painted the eyes in...
normally with this type of helmet eyes would be in the shade.. but
in this case I felt there was a need to put them in.. of course
this means the whole regiment will get the same treatment.
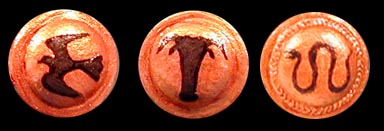
I decided to hand draw and paint the shield design, it seems to be a bit washed out in the photo, but looks just fine to my blurry old eyes in real life. Sometimes I will use a decal as a starter as in the ornamental shields below. For some unknown reason I think all these hoplites are going to have black, red, and white devices on their shields... maybe they went to the same shield painter :) A bit of static grass and rocks makes for a most simple base. This is simply done with some white glue globbed on with an old brush, and then I dump on my 'special blend' of gravel, static grass and what-not. This blend is for my Persian style armies, since this band of mercenaries will first be joining my Later Achaemenid host as their 'backbone.'
|
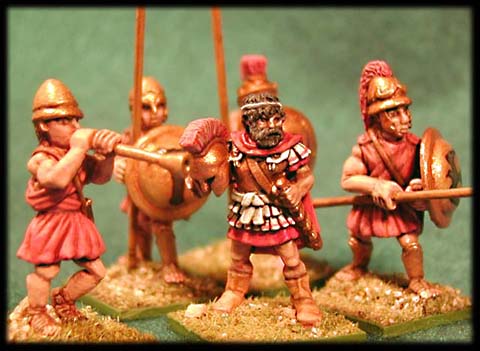
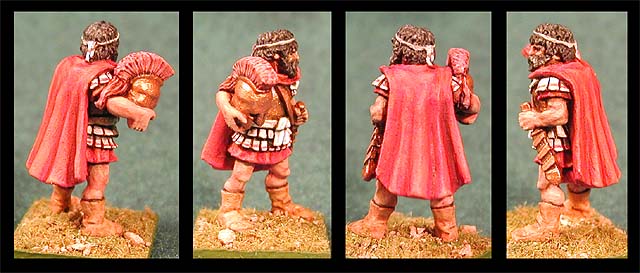
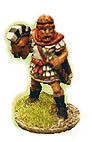
The Polemarch:
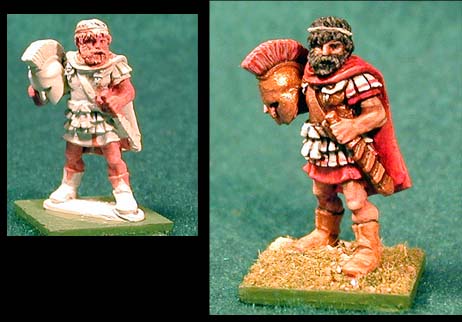 |
The Polemarch started off like any of the figures, primed and blocked in as above. Since this is such a nice model I decided to paint it straight through, before finishing out the phalanx. His cloak is plain red, but if these hoplites perform glorious deeds, I'll reward the figure by painting on some fancy trim later. He is a burly and rugged looking fellow, tough enough to keep the Greek troops in line and savvy enough to deal with the Persian high command's shenanigans!
|
Here's a look at some other folk's excellent presentation of the same miniature:
| Foundry's: | Tony Edward's: | Wim Van den Berghe's | ||
 |
 |
 |
Do you have a photo of this figure to show off as well? I'd like to add it in so we can share across the Internet, just send the link info to the email address below, or we can make arrangements to post your photo here! (please no attachments. I'll delete them because of viruses!)
Stay tuned for part two, finishing the regiment!
Links to Greek Shields and hoplite reference


02/05/2020