
With a little perseverance, and patience, over time you can fill up
a case like this with hundreds of nicely painted figures!
Last Modified 01/20/07
Painting 101
By Jeff Jonas 3-09-01
I'm not no 'Paint Nazi'. But I will admit that it is much more enjoyable to play a miniature game vs. 'real' miniatures as opposed to stand-ins (primed/or bare metal aren't 'real' yet). Painting military miniatures is a joy and a challenge, and I appreciate everyone's efforts to try to field a fully painted force, as that is (for me) half the fun of gaming. The following is just a few tips to help somebody new to painting wargames miniatures.. nothing earth shatteringly new, just basic stuff. Eventually I will get some illustrations up, and some other bits dealing with detailing, and techniques. But for now the basics.
With a little perseverance, and patience, over time you can fill
up
a case like this with hundreds of nicely painted figures!
First, I am a decent miniature painter, I'm lucky.. I have some talent, and I've been
doing it A VERY LONG TIME. Gamers shouldn't compare their first efforts to GW/Foundry
Studio professionals and Golden Demon winners at first- they should try to achieve
completed armies ready to play to a Wargames standard. By which I mean, the models are
covered, flesh parts are flesh, bronze is bronze. The bases are painted and flocked. Also,
do pay attention to your movement trays and sleds... while some may find it 'discourteous'
to play against people that don't have painted lead, I find that it is much more
frustrating to play somebody that hasn't given his army any kind of thought of
organization, and every time he moves a unit, models are falling and knocking his (and
mine) about. A few quick movement trays make the game move faster, which is always a good
thing.
Many folks complain that they can't make their figures look good, as much as they
try. I have in the past taken friends miniatures that they have started and declared
their attempt was hopeless, and upgraded them to much higher quality figures just by
adding a few touches described below.
The biggest mistake somebody makes when starting out painting is to ask about complex
painting techniques such as washes, and dry-brushing. These are complicated tricks to use
at first, and nothing puts off a novice painter more than the frustration of wrecking his
figures by attempting to jump to this next level right off the bat. Remember it is one
step at a time. The nice thing about a completed army painted to a wargames standard, is
that you can always go back and add in the washes and dry-brushing and extra highlighting
later, so getting your figures blocked in, shaded, and detailed is the first step.
Rather than repeat the often described processes of prepping and "how many figures to
paint at one sitting" (which could be another pontification in itself!) I would
prefer to dive in and describe "Basic painting", the way to get your army onto
the table the fastest.
After the figures are cleaned and primed (we will assume with nice commercial white spray
paint, I use Krylon here in the states), I usually affix them to balsa strips with
ticky-tack stuff (it holds your wife's prized plates in place when earthquakes hit-- it's
also called blue tack), rubber cement works (too smelly), or light amounts of white glue.
I usually put 2-4 on a strip, it gives you something to handle. I use magnetic bases now,
and these stick well to a piece of metal strip, so I usually base my figures at this
stage. By the way greasy fingertips are the worst thing to add to your models paint,
especially before they are coated with matte spray or varnish. Don't be handling primed
figures too much or you will find the paint will bead and streak. (I have witnessed
players gaming with the same primed figures session after session, until the white figures
are chipped and begin to take on a yellowed appearance...unfortunately most painting is
wasted on such abused miniatures, and I would prefer stripping and starting over than
trying to salvage such greased up figures.
Planning it out:
I assume you have gathered notes or references and have some kind of plan for your
models... not having a plan... is BAD! But, you can still proceed if your are vacillating
... but you will have to commit at some point. (Red or green pants.. green.. no red... ok
red and green.. that's a plan!). There are many sources of fine reference available on
most subjects from Sumerians to Saracens out there. A good reference work will speed up
your painting since you won't have to be constantly thinking up the color scheme as you go
along.
Blocking in:
Blocking is where you cover each area of the model with a separate color. With large
masses of troops this is the most time consuming part of the job (next of course to
the other time consuming parts).
It is usually best to leave off shields by the way.. but that's a matter of preference.. I
just hate having to stick my brush into those dark impossible to reach areas.
This seems so typical, but it's almost always best to start by blocking in flesh. So do
all the flesh. Technical tip: Don't use too much paint!
Acrylics are mostly self leveling, but globing on too much will clog your details.
So, you have your flesh done, now start 'dressing' the figure. Just like layers of
clothing I start at the lowest layer then build on top.
(for example: tunic first then jerkin).
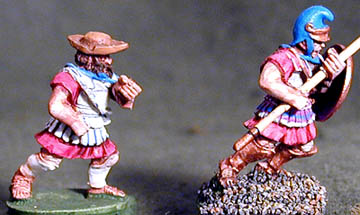
These Old Glory 25mm Phalangites show a blocked in figure to the left
and a finished model on the right. The blocked in figure could just have some straps
and armor finished and with a pike and shield added it's ready to go.
Keep your workload manageable.. too many figures at a sitting and you will feel
overwhelmed.. I like to block in a whole regiment 24-32 one color at a time, then when
it's detail or shading time 8 figures at once is about all I can handle without a brain
melt. I block iron/steel metal parts black or dark brown in the case of bronze.
So you have a nice 24 figure regiment blocked-in.. the cool thing now if they are based is
that they are almost ready to play... you've almost achieved "Wargames
standard". (And I might add they are infinitely better than primed or bare metal).
Cutting:
Invariably while nodding off listening to the old Genesis CD while "Blocking"
you will have slopped some red tunic onto an arm, or onto the armor, etc. Cutting is just
going back with those colors where you slopped, and painting out the messes, you can do
this while blocking... but it slows that down.. remember this is basic painting to get
your army on the tabletop impress your friends and win the hearts of girls! (Well we can
dream). Cutting is just a fancy term for cleaning up edges, or fixing, but artists like to
give it foofy name to impress folks who don't know better.
Shading:
Shading is the toughest thing for a novice to get right, and is therefore the most
frustrating. This is where all those fancy techniques, washes, dyes, and dry brush come in
to play... ignore them for now! This is about basic shading, not the fancy stuff.
Blacklining:
One of the very most effective ways to make your figures look nice is to "black
line" them. Basically with a thin brush of thin black or dark color, outline
everything- belts, scabbards, cuffs, and straps will immediately 'pop out' once black
lined. Nicely black lined figures have a 'clean' toy soldier look to them.
They look fantastic on the tabletop. Black lining used to be all the rage when miniatures
had less details, but even today's miniature masterpieces will look good with this
treatment.
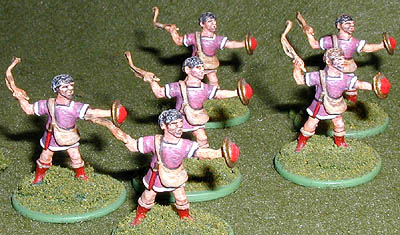
These are 25 year old Minifigs, true 25mm Rhodian
slingers,
they illustrate how "blacklining" can pop out details on figures.
Layering:
More complicated process is layering colors on top of your black lined figure to add
highlights. This involves a lighter shade of the base color just brushed on the highest
parts, do this sparingly with a color close to your basetone and it will raise the
painting bar on your regiment very quickly. You don't have to highlight every fold
either.. remember the light is generally coming from the top, so shoulders, arms, folds in
the tunic at the waist are getting hit by light so a few highlights add dimensionality.
Shading the darkest areas too will add more depth, but I would be careful here as too much
shade will make your figures look stark. Layering shades is very nice, but you will
have to mix some paint, some white/and or buff/yellow to lighten it up. This is where
having a good source like an Osprey publication can help you .. just try to match the
highlight shades in the paintings. If your figures end up having the palette of Angus
McBride I'm sure they will be prize winners!

This 25mm Foundry Persian illustrates layering. A dark shade
of purple is the base then medium layers are applied to the folds,
then some very light highlights are applied. Same goes for the headdress in yellows.
Oh yes, there is some "detailing" there too.
One thing you might want to pay attention to is that most Acrylic paints dry a bit darker
than when they are wet, if you need to paint the same highlight shade over a number of
days you may want to mix up enough and put it in a sealing plastic tub, so you don't have
to continually try to match the color. But, this is a minor point as minute shading
differences can actually enhance the look of miniature forces.
You can stop now, and base and flock your figures..they are ready to play.. the further section is about details.... if you are careful and you don't handle your figures too much you play a few games with them. I tend to reward the best showings in games by adding in extra details, upgrading them to fancy shields .... alternating crest colors, some of these things can be done later to reward your elites for that heroic last stand... or punish them! ( I remember a player who clipped the feathers off his Republican Roman legion after they bolted a long time ago!)
Detailing:
Now that the unit is blocked in and shaded, you can graduate to detailing. This is where
you decide to hog wild with tunic borders, designs on armor, eyes on faces, etc. Obviously
this is time spent upgrading your 'wargaming grade figures' to individual display pieces,
but be forewarned this is the most time consuming stage as each figure might need quite a
bit of attention to bring out all of it's details, and even more if flamboyant shields are
desired. However there are numerous companies that provide very nice transfers now, such
as Veni Vidi Vici in England, Wargames Foundry, and my own favorites by Dark Age Design. I
still will paint shields when I have the bug, but these newer transfer can override that
urge quickly when I need to get a regiment done!
As for faces and detailing, this is a difficult call, on older (true)25mm figures, facial
detail was very limited, and was easier to slough through, but newer 28mm figures are
quite detailed and eyes can be discerned. My rule of thumb is to work in scale, that has
to do with colors and details. Color scale means you should always make your figures a
little more washed out than reality, more gray than black for example.. as things get
farther back they get washed out, nothing makes your figures look more like toy soldiers
than high contrast colors. Pastels gray things back, and make the army look like it
fits together.
The same applies to faces, if the face is in a peaked helmet, then most times in regular
sunlight the eyes will be in shadow, so it's a good idea not to emphasize them too
much. Also, as people get further back you'll not notice the whites of their eyes nearly
as much, so line work can make a face better than bright white eyeballs. Another good
thing to remember with faces is not all miniatures are sculpted equal! Some figures may
have "Mooshy" facial details or an asymmetrical eye... it's a real good idea to
de-emphasize these by not adding very much detail at all....we don't want our Cretans to
end up like Cretins!

These figures needed to show some eye details, in both
cases my goal was to make the eyes as subtle as possible and still 'be there'. The
Persian caused
some fiddling as I somehow insisted that he have steely gray eyes!
Sometimes it's nearly impossible to paint a 28mm figure with the designs as depicted in our references, in this case I say simplify a bit, scale it up a tad. Diamond patterns are the worst, someday I may get my Persian guards done with their yellow and red diamond pants! (I will most likely have white hair by then!)... but most likely they will end up with dots... still a nice detail... but it won't turn me into any more of a lunatic than I am already.
Once all of this is done, I then usually spray them with some really good matte spray. I usually use Testors dullcoat, as this is most consistently flat which I like, and has protected high lead content figures for 30 years. But make sure you test it first! Some so called "Matte" sprays will leave a semi-gloss look. Although this is a matter of taste, I prefer flat. Don't spray over armour or metallic paint either, it will frost and lose it's sheen.. I paint these parts last, after spraying (metal paints seemed to take rough handling a better, and are usually easy to touch up if a chip happens. It's easier to open the tub of silver paint, that to try to match that linen tunic color again!
Finally I will paint in the armor bits, let that dry overnight and then flock or add texture to the bases.... Voila! A finished WAB regiment ready to kick it!
Jeff Jonas
Created by Jeff Jonas 03/01