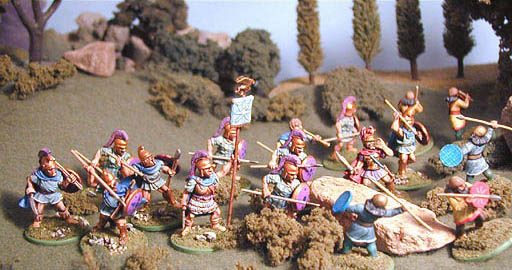
Agrianian javelinmen drive the Persian light troops into the hills.
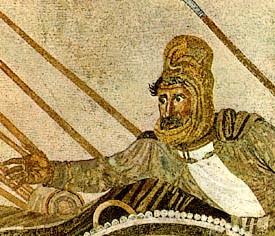
Alexander vs. Darius
The Battle of Issus 333 BC
by Jeff Jonas
Part I: The Campaign and Battle Part II: The Battle as a Wargame
Part III:
Duncan Head's analysis and sources Part IV: Sources and references
Agrianian javelinmen drive the Persian light troops into the hills.
Part II: The Battle as a Wargame
Set-up
The initial scenario is presented with a ten foot by six foot table in mind. The forces
are roughly at a ratio of 1 figure equals 100 men. Some units may be lower than this, and
some (such as the Persian levy) may represent denser formations. The units are derived in
most part from the OOB presented in Part I.
Part III offers plenty of information to try out, if my analysis doesn't excite the
reader. most of the compromises are related to game presentation, to fit WAB's peculiar
game style. The large amount of miniatures needed will suit this mostly for team play.
A few scenarios will be presented, an unbalanced "historical" scenario in
which the Persians are roped into their historical mistakes, and looser
"gamey" scenarios which allows a more balanced game, but shift the edge to the
Persians. Finally a smaller OOB is presented for play on a six foot wide, by four
feet deep table, for those who just wish to play the game and gain an introduction to the
battle.
All troop listings are taken from "Warhammer: Alexander the Great." Army points are not considered from the OOB, although in a free form game on a six foot table both sides could play out with up to 2500 pts. and pick their own army composition, but this can really challenge the Macedonians.
Terrain Diagram
| Diagram 1: The terrain is laid out based on the diagram below. The gridlines represent a one foot square each. The following terrain types are in play: 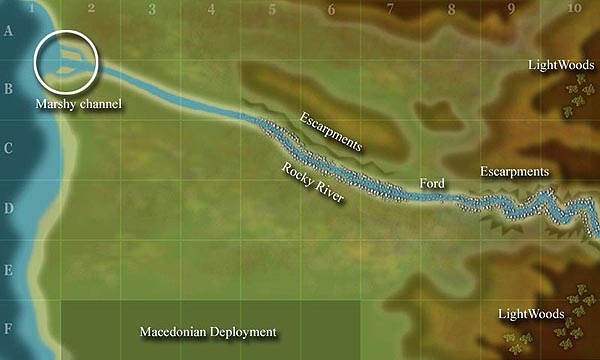 |
Coastline: Defines where the ocean begins,
Ocean is impassible to all troops. |
High Escarpments: This terrain is past the
ford into the hills to the table edge. Cavalry may not cross this terrain, unless forced
into it by rout or pursuit. Formed units lose their phalanx benefits if
attacking across the escarpments, from either side. All units lose rank bonuses, if
attacking across. All formed troops pay twice the normal movement costs in this
terrain.
Low Hills: The light brown terrain is the high ground as it gradually
undulates upwards towards the Amanus range. The hills only affect Line of Sight and do not
confer any combat results bonus.
Higher hills: The darker brown areas represent the steeper slopes inland.
These count as hills for combat results. Formed troops may not march move or charge across
this steeper ground.
Light Woods: This represents rough scrub and low trees. These count as
light woods and obstruct Line of Sight, and obstructs movement.
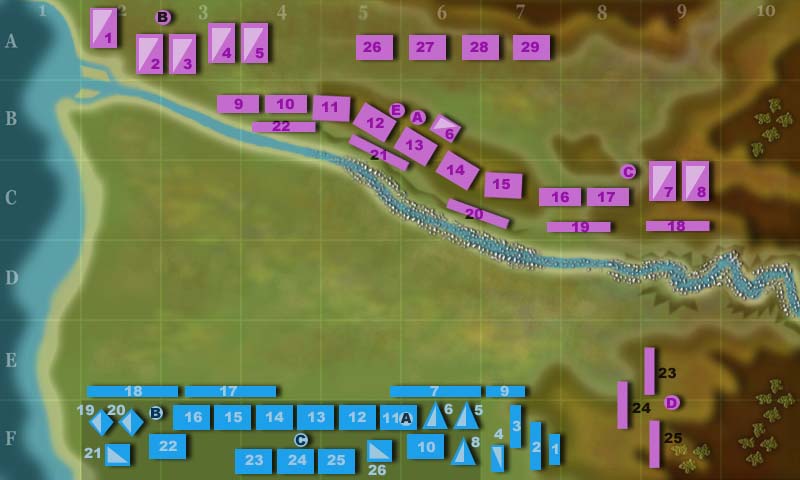
Diagram 2:
The units in play are deployed according to the map above. Persians are in pink.
Macedonians are in blue. The numbers correspond to the OOB manifest that follows.
Orders of Battle
The following OOB is presented as a suggestion only. Obviously it will be a
rare even that allows players to gather a thousand miniatures for a single game. Feel free
to use this as a guideline. Mike Bruck offers a "safe and sane" OOB that
he built from this info, which is presented later.
Persian |
|||
Unit# |
Type |
Models |
Commands |
A |
Darius, General, Great King
in chariot |
1 |
(6,11,15,26,27,28,29) |
B |
Nabarzanes, Sub-General, heavy armor, throwing spear,
armored warhorse |
1 |
(1,2,3,4,5,9,10,22) |
C |
Rheomithres, warhorse |
1 |
(7,8,16,17,18,19) |
D |
Unnamed Satrap, warhorse |
1 |
(23,24,25) |
E |
Thymondas, Greek Polemarch |
1 |
(12,13,14,21,22) |
1 |
Misc. Cadusian/others, Colonist horse,
L/S/M , throwing spear |
10 |
|
2 |
Barcanian Colonist horse, L/S/M, special*, bucklers |
12 |
|
3 |
Persian horse, L/S/M |
16 |
|
4 |
Armored Persian horse, L/S/M |
16 |
|
5 |
Armored Kappadokian Persian horse, L/S/M |
12 |
|
6 |
Persian Kinsmen. L/S/M |
10 |
|
7 |
Hyrkanian Satrapal cavalry, L/S/M |
8 |
|
8 |
Median Skirmish cavalry, L/S/M |
8 |
|
9 |
Kardaka light infantry*, L/S/M, shield, spear,
javelin |
24 |
|
10 |
Kardaka light infantry*, L/S/M, shield, spear,
javelin |
24 |
|
11 |
Kardaka hoplites, L/S/M, light armor, large shield,
thrusting spear |
24 |
|
12 |
Greek Mercenary hoplites, L/M |
24 |
|
13 |
Veteran Greek Mercenary hoplites, L/M ,light armor,
large shield, thrusting spear |
24 |
|
14 |
Greek Mercenary hoplites, L/M, large shield, thrusting spear |
24 |
|
15 |
Kardaka hoplites, L/S/M, light armor, large shield, thrusting spear |
24 |
|
16 |
Kardaka light infantry*, L/S/M, shield, spear,
javelin
|
24 |
|
17 |
Kardaka light infantry*, L/S/M, shield, spear,
javelin
|
24 |
|
18 |
Skirmishers, javelins, buckler |
12 |
|
19 |
Mardian archers*, L |
16 |
|
20 |
Greek peltasts, L/M |
12 |
|
21 |
Greek peltasts, L/M |
12 |
|
22 |
Skirmishers, bow |
12 |
|
23 |
Skirmishers, javelins, buckler |
12 |
|
24 |
Skirmishers, javelins, buckler |
12 |
|
25 |
Takabara, javelins, L/S/M |
16 |
|
26 |
Satrapal Levies**, L/S/M |
36 |
|
27 |
Satrapal Levies**, L/S/M, spears, buckler |
36 |
|
28 |
Satrapal Levies**, L/S/M, spears, buckler |
36 |
|
29 |
Satrapal Levies**, L/S/M, short bows |
36 |
|
|

Macedonians |
|||
Unit# |
Type |
Models |
Commands |
A |
Alexander, General, on warhorse, heavy armor, xyston |
1 |
(1,2,3,4,5,6,7,8,9,10,11,12) |
B |
Parmenion, Sub-General, on warhorse, heavy armor, xyston |
1 |
(16,17,18,19,20,21,22) |
C |
Coenus, on warhorse, heavy armor, xyston |
1 |
(13,14,15,23,24,25,26) |
D |
Craterus, light armor, shield, pike |
1 |
|
E |
Attalos, light armor, shield, javelin |
1 |
|
| F | Nicanor, light armor, shield, javelin |
1 |
|
1 |
Agrianian
slingers |
6 |
|
2 |
� Agrianian javelinmen, L, javelins, |
8 |
|
3 |
� Agrianian javelinmen, L, javelins, |
8 |
|
4 |
Greek Mercenary cavalry, Companion cavalry
detachments, L/M |
6 |
|
5 |
Companion cavalry, L/M |
10 |
|
6 |
Agema Companion cavalry, L/M |
10 |
|
7 |
Macedonian archers, L |
12 |
|
8 |
Prodromoi cavalry, (Combine lancers and Paeonians, half
lancers) L/M |
8 |
|
9 |
Greek Peltasts, L/M |
12 |
|
10 |
Agema Hypaspists, L/M |
16 |
|
11 |
Hypaspists, L/M |
16 |
|
12 |
Agema Pezhetairoi, L/M |
24 |
|
13 |
Pezhetairoi, L/M |
24 |
|
14 |
Pezhetairoi, L/M |
24 |
|
15 |
Pezhetairoi, L/M |
24 |
|
16 |
Pezhetairoi, L/M, |
24 |
|
17 |
Mercenary skirmishers, L, (Thracians) javelin, buckler, |
16 |
|
18 |
Cretan archers, shield, bow |
12 |
|
19 |
Thessalian Pharsalian cavalry, L/M, heavy armor, spear
and javelins |
10 |
|
20 |
Thessalian cavalry, L/M |
9 |
|
21 |
Allied Greek cavalry, L/M |
8 |
|
22 |
Pezhetairoi, Craterus’ battalion, L/M |
24 |
|
23 |
Greek League hoplites, L/M |
32 |
|
24 |
Mercenary hoplites, L/M |
32 |
|
25 |
Veteran mercenary hoplites, L/M |
32 |
|
26 |
Mounted Grooms, javelins |
8 |
|
|
A Historical Scenario
The game will not develop like the historical battle unless some
constraints are imposed on the players. Again these may be used in total, or players may
choose which special rules to apply to their games. Set up according to the diagram above.
The Macedonians always take the first move.
Special rules: Players should use all the AtG special rules for Persians and Macedonians. The Great King rule must be used. Alexander may re-roll one of his side's Oracle pools.
Oracles: The
Macedonian player has three pools of Oracles. Alexander gets 2D6. Parmenion gets 1D6 and
Coenus gets 1D6. Parmenion and Coenus may only play their oracles on their own command
within 12". Alexander may play or add oracles on any units within 12", even
those under another commands, up to the normal limits. At the start of the game Alexander
may give up to 2 oracle points to each sub-general. A Commander's oracles may not be used
if he is fleeing or killed.
Multi-Player: Certainly one of the best ways to 'simulate' command and control
issues is to have multiple players move and control their troops. Issus is a great
multi-player scenario as the action can be broken up into wings in which each commander
can focus on the threats in front. On the OOB above each General or Subordinate General's
or officer's command is listed to the right. (See page 10 for Sub-Generals rules)
1) Players may not swap
troops with other players. Other players will only gain control of another player's troops
if the model representing that character is killed or runs off the table.
2) Players may elect to set up a 5 minute conference talk period before their turn starts,
after this there is no more talking between them unless their character models are within
12" of each other. Players may talk amongst themselves freely during the opponent's
turn, but should not confer away from the table.
3) Persian player C and D may be combined into one command.
4) Each player's command can be kept track of for a 50% edginess point. Once the command
no longer has 50% of its models on the table, then the remaining units must take all
leadership tests using 3D6
Persian Command paralysis: The Persians seemed to be in disarray as the battle started. They made no initial movement to counter Alexander's actions. On the first turn only Command D is active and may move or declare charges. On turn two, command D, and up to two other commands may move their troops or charge, chosen by Darius. On turn three all Persian commands may move and charge normally. All units may counter-charge, react to charges, and shoot normally.
Persian Light
Infantry: Kardakes and Mardians may not skirmish. Only Takabara may skirmish and
reform.
Persian Levies Infantry: The units of levies may not move, charge, shoot,
or reform, unless they pass a leadership test each and every time they wish to do so. In
the case of a charge passing this check also passes any 'fear' tests. Players may well
wish to not even put these troops on the table. However, the Persian player should mark
where they are deployed with deployment trays, or some other method to show that these
troops are still blocking movement. Assume the units do not move, but only will leave if
they fail panic an they are immediately routed off, no longer parked on the table edge. If
the invisible levies rule is chosen, then remove one unit of Alexander's Greek League
hoplites to compensate.
Game Length: The game should last at least six turns. After that twilight sets in. If Alexander hasn't won by then, he deserves a draw!
Optional rules: Players should consider using the mixed armor rules for this scenario.
Victory: Darius wins if they draw, or kill Alexander... Alexander wins if Darius is killed, routs off the field, and/or the Persian army is reduced to break point.
A Limited Deployment Scenario
This game will allow the Persian player limited freedom to thwart
Alexander. Each player deploys his commands within their deployment zones. The
Macedonians always take the first move.
Deployment: Commands must deploy with some portion of each unit within 12" of their commander. (Commands may not be spread out all over the table, they must stay within command at the start at least). Each side must deploy one unit from each command with the Persians going first. Thus the Persian player will deploy 5 units first, then the Macedonians will deploy at least three units, each from a different command. Characters deploy last as one selection.
Persian units deploy behind the Pinarus river. Command D must deploy in areas E8, E9, F8, F9. Macedonian troops are deployed in their deployments zone. Skirmishing foot may deploy outside the box but must stay within 4" of the deployment zone in Row E. Units 1,2,3,4 may deploy in area F7.
Oracles: The Macedonian player has three pools of Oracles. Alexander gets 2D6. Parmenion gets 1D6 and Coenus gets 1D6. Parmenion and Coenus may only play their oracles on their own command within 12". Alexander may play or add oracles on any units within 12", even those under another commands, up to the normal limits. At the start of the game Alexander may give up to 2 oracle points to each sub-general. A Commander's oracles may not be used if he is fleeing or killed.
Game Length: The game should last at least six turns. After that roll a D6,
Add in other scenario rules above to taste, or leave them off to give the Persians an extra edge.
Victory: Use normal victory conditions. If Alexander is killed then the best the Macedonians can achieve is a draw..
A Free Deployment Scenario
This game will allow the Persian player full freedom to thwart Alexander.
Each player deploys his commands within their deployment zones. The Macedonians
always take the first move.
Deployment: Units may be placed anywhere in their deployment zones as described above. Troops may deploy irrespective of command restrictions. Persian cavalry and light infantry (but no Kardakes) may deploy within 6" of the river, on the South side.
Oracles: As above.
Game Length: As above
Add in other scenario rules above to taste, or leave them off to give the Persians an extra edge.
Victory: As above.
Mike Bruck's "Safe and less insane" scenario!
Try the scenario rules with the following OOB and a table scaled down to 6-8 feet by 4-5 feet. Mike suggest this for gamers to wet their whistles for the big game!
Here is my Mike-sized WAB OOB taken from your article (at 1:200)
Persians:
Darius
2x20 Kardaka Hoplites
2x24 Kardaka Light Infantry
2x6 Mardian Archers
2x25 Greek Hoplites
2x15 Persian Heavy Cavalry
1x10 Median Cavalry
2x12 Takabara Light Infantry
2x32 Levy Infantry (or use the invisible levies rules above and remove the Greek League
Hoplites below)
Totals: 278 Models; 1 chariot (with Darius), 40 Cavalry, 238 infantry
Macedonians:
Alexander
Parmenion
1x10 Thessalians
1x15 Thracians
1x6 Cretan Archers
2x30 Center Phalanx (pike)
1x18 Hypaspists
1x10 Companions
1x6 Macedonian Archers
1x8 Agrianians
1x15 Mercenary Peltasts
1x25 Greek League
Hoplites
1x25 Greek Mercenary Hoplites
Total: 200 Models; 2 characters, 20 cavalry, 178 infantry
(Jeff note: Use the commanders in the high OOB as unit leaders in this sized game.. so Nabarzanes would be the leader model in the Persian cavalry. Coenus would be the leader of the Agema Pezhetairoi... etc.)
A free choice
and free deployment scenario
Allow both sides to choose their armies within 2.5K
for the small table, and within 5 k each for the big table.
Questions or Comments Email: jjartist@earthlink.net

01/20/07